Want crisp, clear recordings? Lowering your studio’s noise floor is key. Here’s how you can achieve a quieter recording environment:
- Choose the right location: Opt for spaces away from noisy areas (e.g., roads, airports) and with solid walls and minimal windows.
- Set up equipment properly: Position microphones and cables to reduce interference and improve signal clarity.
- Use sound treatment: Add acoustic panels, bass traps, and diffusers to absorb noise and manage frequencies.
- Eliminate noise sources: Address power supply hum, HVAC noise, and ensure proper cable management.
- Apply noise reduction software: Use tools to clean up recordings during post-production.
For a quick comparison of methods, check this table:
| Method | Effectiveness | Complexity | Cost | Best For |
|---|---|---|---|---|
| Studio Location | High | High | Moderate | New setups |
| Equipment Setup | Medium-High | Low | Low | Existing studios |
| Sound Treatment | Very High | Moderate | Moderate-High | Long-term improvements |
| Noise Source Removal | High | Low | Low | Quick fixes |
| Noise Reduction Software | Medium | Very Low | Low-Moderate | Post-production cleanup |
Start with simple fixes, then invest in long-term solutions like sound treatment for lasting results.
How to Reduce Noise Floor
1. Select the Best Studio Location
Choose a location that naturally minimises background noise. Pay attention to nearby noise sources, building structure, and how noise levels change throughout the day.
Stay Away from Noise Sources
Pick a spot far from common noise generators, such as:
- Busy roads or motorways
- Airports and flight paths
- Train tracks
- Factories or industrial areas
- Construction zones
Check the Building’s Structure
Certain building features can help block out sound. Look for spaces with:
- Thick, solid walls (brick or concrete are ideal)
- Few or no windows
- Concrete floors
- A private entrance
- No shared walls with noisy neighbours
Test Noise Levels at Different Times
Noise levels can vary depending on the time of day. Visit the location and listen for ambient sounds during:
- Early mornings (05:00-07:00)
- Rush hours (08:00-10:00 and 16:00-18:00)
- Late evenings (22:00-24:00)
- Weekends
If possible, hire an acoustic professional to assess the space. Identifying potential issues early can save time and money on soundproofing later. While acoustic treatments can improve any room, starting with a quiet location makes achieving professional audio quality much easier.
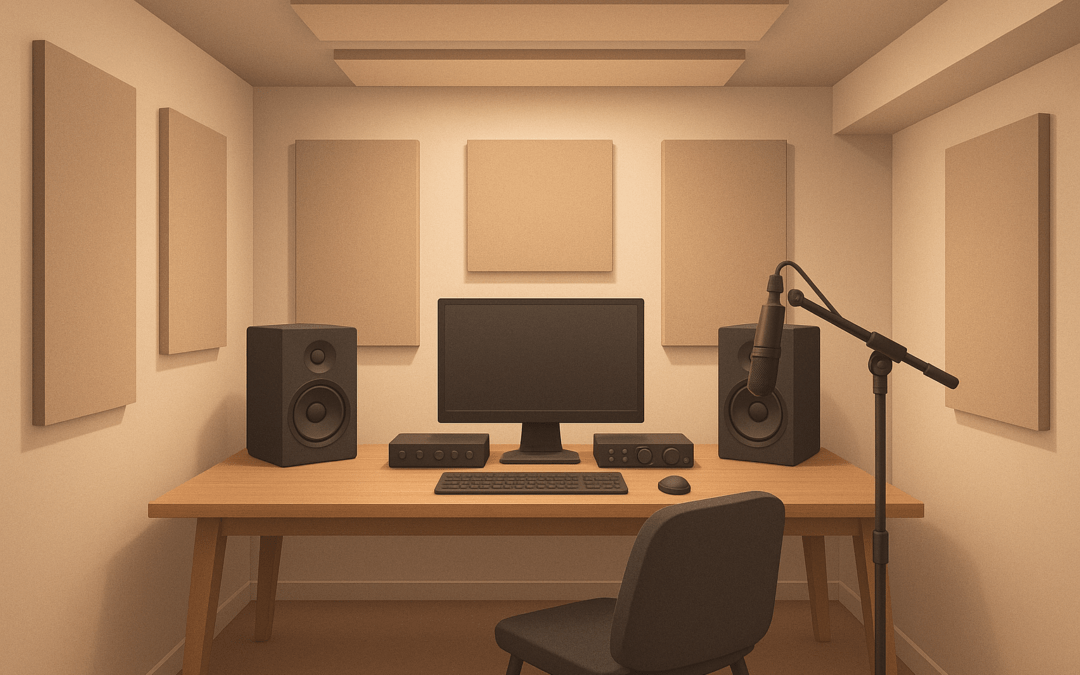
2. Set Up Equipment Correctly
Once you’ve chosen the right spot for your studio, the next step is to set up your equipment properly to minimise background noise. A well-organised setup helps keep your studio’s noise levels low. Place microphones to focus on the sound you want to capture, and arrange preamps and recording devices to achieve a strong signal-to-noise ratio.
Tips for Equipment Placement
- Place microphones so they focus solely on the sound source you want to record.
- Position preamps and recording devices carefully to maintain clear signal paths and reduce unwanted interference.
- Ensure all connections are secure and cables are neatly arranged to avoid accidental noise or disruptions.
3. Add Sound Treatment Materials
To improve your studio’s acoustics, sound treatment materials are key. They reduce noise by absorbing reflections and cutting down on reverberation. Here’s a breakdown of the materials that work best for different frequency ranges.
Key Sound Treatment Materials
Acoustic Panels
Install these panels at first reflection points to absorb mid-to-high frequencies. Focus on areas where sound initially bounces off surfaces to reduce unwanted echoes.
Bass Traps
Position bass traps in the corners of your room to manage low-frequency build-up. They’re particularly effective in tri-corner areas, where two walls meet the ceiling or floor, as this is where bass tends to accumulate.
Diffusers
Place diffusers on walls opposite your listening position. These scatter sound waves evenly, reducing flutter echo while keeping the room’s natural ambience intact.
Material Selection Overview
| Material Type | Function | Best Placement |
|---|---|---|
| Acoustic Panels | Absorb mid-to-high frequencies | First reflection points on walls |
| Bass Traps | Control low-frequency build-up | Corners and tri-corners |
| Diffusers | Spread sound waves evenly | Walls opposite the listening area |
Professional Assistance
For the best results, consider working with sound treatment specialists. Companies like Sound of Silence offer detailed acoustic testing and consulting services. They can help with sound analysis, material placement, and creating a customised treatment plan.
sbb-itb-06ab728
4. Remove Studio Noise Sources
Unwanted noise in your studio can affect the quality of your recordings. By identifying and addressing these issues, you can achieve cleaner, more professional sound.
Equipment-Related Noise
Power Supply Interference
Electromagnetic interference from power supplies can be a major problem. Use shielded, high-quality power supplies and keep power cables separate from audio cables. If interference persists, consider investing in a power conditioning unit.
Cable Management
Messy cables can lead to interference. Use balanced XLR cables for better signal integrity, keep audio and power cables apart (preferably crossing at right angles), and replace any damaged or worn cables.
Environmental Sources
HVAC Systems
Heating and cooling systems can introduce vibrations and noise. You can reduce this by adding acoustic treatments to the ductwork or using flexible connectors. Running the HVAC system at lower speeds during recordings can also help minimise disruptions.
Regular cleaning and maintenance of equipment are just as important as addressing environmental factors to maintain a low noise floor.
Equipment Maintenance
Keep your gear in top condition by routinely cleaning and checking connections. This includes microphone capsules, audio interface ports, monitor connections, and patch bays. Proper grounding is also essential for reducing noise.
Ground Loop Prevention
Ground loops often cause annoying hums in studio setups. To avoid this, try to power all your equipment from a single source and ensure your electrical system is properly grounded. This simple step can make a big difference in reducing noise.
5. Apply Noise Reduction Software
Once you’ve reduced physical noise during recording, it’s time to fine-tune your audio with digital noise reduction tools.
Noise reduction software works by identifying and eliminating unwanted sounds in your recording while keeping your original audio intact.
Real-Time Noise Suppression
These plugins adjust noise levels as you record. They analyse the audio signal in real time, reducing consistent background noise automatically. This is especially useful for recordings with dynamic sound sources.
Spectral Noise Reduction
Spectral editing tools let you pinpoint and address specific frequencies where noise stands out. Here’s how they help:
- Highlighting noise patterns in silent sections
- Removing unwanted noise in specific frequency bands
- Maintaining the natural quality of your audio
Adaptive Noise Reduction
This type of software adapts to changing sound environments, making it effective for handling inconsistent background noise.
Tips for Using Noise Reduction Software
Start Light
Begin with minimal processing, such as 6–12 dB reduction, to avoid introducing artifacts.
Use Multiple Passes
Instead of heavy noise reduction in one go, apply several lighter passes. This method helps retain audio clarity while gradually removing noise.
Prepare Before Processing
Before diving into noise reduction:
- Capture a noise print: Record 3–5 seconds of room tone to help the software identify background noise.
- Back up your files: Always work on a copy of your recording to avoid losing the original.
- Fix obvious issues first: Remove clicks, pops, or other noticeable problems before applying noise reduction.
Monitoring and Quality Checks
Always review your processing with high-quality studio monitors or headphones. Pay close attention to:
- High frequencies: Watch for a loss of brightness or "air" in the sound.
- Low frequencies: Ensure the warmth of the audio isn’t diminished.
- Overall sound: Check that the processed audio still feels natural and unaltered.
Method Comparison
Here’s a breakdown of various methods to help you decide how to lower the noise floor in your studio effectively:
| Method | Effectiveness | Implementation Complexity | Relative Investment | Ideal For |
|---|---|---|---|---|
| Optimal Studio Location | High | High – requires detailed planning | Low to moderate | New studio setups |
| Equipment Setup | Medium to High | Low – can be adjusted quickly | Low | Existing studios |
| Sound Treatment Materials | Very High | Moderate – requires proper installation and design | Moderate to high | Studios aiming for long-term solutions |
| Noise Source Removal | High | Low to moderate – depends on the source | Low | Quick noise reduction projects |
| Noise Reduction Software | Medium | Very low – a simple post-production fix | Low to moderate | Post-production adjustments |
This table provides a snapshot of each method’s strengths and challenges, setting the stage for a closer look at costs, implementation, and overall benefits.
Cost-Benefit Analysis
Sound treatment materials may demand a higher upfront investment and effort, but they provide durable and effective noise reduction over time.
Implementation Considerations
When deciding on a method, weigh these factors:
- Budget: If funds are limited, start with adjustments like equipment setup or removing noise sources for immediate improvements.
- Time: Quick fixes, such as noise reduction software, are ideal for tight deadlines, while options like sound treatment require more planning and installation time.
- Studio Layout: Changes like adding sound treatment will have varying effects depending on your room’s dimensions and design.
- Recording Needs: The type of recordings you do will influence whether short-term fixes or long-term solutions are more suitable.
Professional Assessment
For tailored advice, consider consulting acoustic experts like Sound of Silence (https://soundofsilence.in) to evaluate your space and recommend the best solutions.
Value for Money
To maximise results, start with low-cost options like noise source removal or equipment adjustments. Over time, invest in sound treatment for more permanent improvements, and use noise reduction software as a complementary tool during post-production.
Next Steps
To reduce your studio’s noise floor, follow these steps:
- Assess Your Current Noise Levels: Use a sound meter to measure and document your studio’s existing noise floor. This will give you a clear starting point.
- Start with Simple Fixes: Address easy and affordable options first, such as moving equipment or eliminating obvious noise sources.
-
Invest in Long-Term Solutions: For more permanent improvements, consider professional acoustic treatments. Companies like Sound of Silence offer services such as:
- Acoustic testing to identify problem areas
- Customised soundproofing solutions
- Expert advice and installation
By addressing these steps in order, you can gradually create a quieter and more controlled studio environment.
Improving your noise floor is a step-by-step process. Begin with quick adjustments, evaluate the results, and then move on to more advanced solutions. Consulting professionals, such as the team at Sound of Silence, can help you make informed decisions that suit both your needs and budget while avoiding unnecessary expenses.
FAQs
What are some affordable ways to reduce noise in an existing studio setup?
Reducing noise in a studio doesn’t have to break the bank. Here are some cost-effective methods to lower the noise floor in your existing setup:
- Use acoustic panels: Install foam or fabric panels on walls to absorb sound reflections and reduce unwanted noise.
- Seal gaps and cracks: Check for gaps around doors, windows, and vents. Use weatherstripping or acoustic sealant to block noise leakage.
- Invest in a good power supply: Electrical interference can cause noise. A high-quality power conditioner can help reduce this.
- Isolate equipment: Use isolation pads or mounts for microphones, speakers, and other gear to minimise vibrations.
- Rearrange your space: Position your equipment away from noisy sources like air conditioning units or external walls.
These simple adjustments can significantly improve your studio’s sound quality without requiring a large investment.
What’s the best way to choose a location for my studio to reduce noise interference?
Selecting the right location for your studio is crucial to minimising noise interference. Look for areas away from busy roads, airports, or other sources of constant noise. Avoid spaces with thin walls or those directly adjacent to noisy neighbours.
If you’re unsure, consulting with acoustic specialists can help you identify potential issues and solutions before you commit to a location. Professional advice ensures your studio is set up in an environment that supports optimal sound quality and minimal disruptions.
What’s the difference between acoustic panels, bass traps, and diffusers, and how do I choose the right ones for my studio?
Acoustic panels, bass traps, and diffusers each serve specific purposes in improving studio sound quality. Acoustic panels are designed to absorb mid to high frequencies, reducing echoes and reflections. Bass traps focus on absorbing low-frequency sound waves, which can cause muddiness, especially in corners. Diffusers, on the other hand, scatter sound waves evenly to create a more balanced and natural acoustic environment without deadening the space.
To decide which to use, consider your studio’s needs. If you’re dealing with excessive echo or high-frequency reflections, acoustic panels are ideal. For issues with bass build-up or a ‘boomy’ sound, bass traps are essential. If your studio feels too flat or lifeless, diffusers can help maintain energy while controlling reflections. A combination of these elements often works best for achieving professional sound quality.